


You don't need a green screen to cut a person or object out of a video in CapCut. Select the clip, run Auto removal, inspect the moving edges, and use Custom removal where the automatic mask drops hair, hands, clothing, or part of the object. On CapCut Web, the same job starts under Smart tools → Remove background.
The distinction that matters comes after the cutout. Replacing the background inside a project is straightforward, while exporting a reusable video with true transparency depends on an alpha-capable format and codec. A checkerboard in the editor doesn't prove that a normal MP4 export will keep transparency.
Choose the Right CapCut Background Removal Method
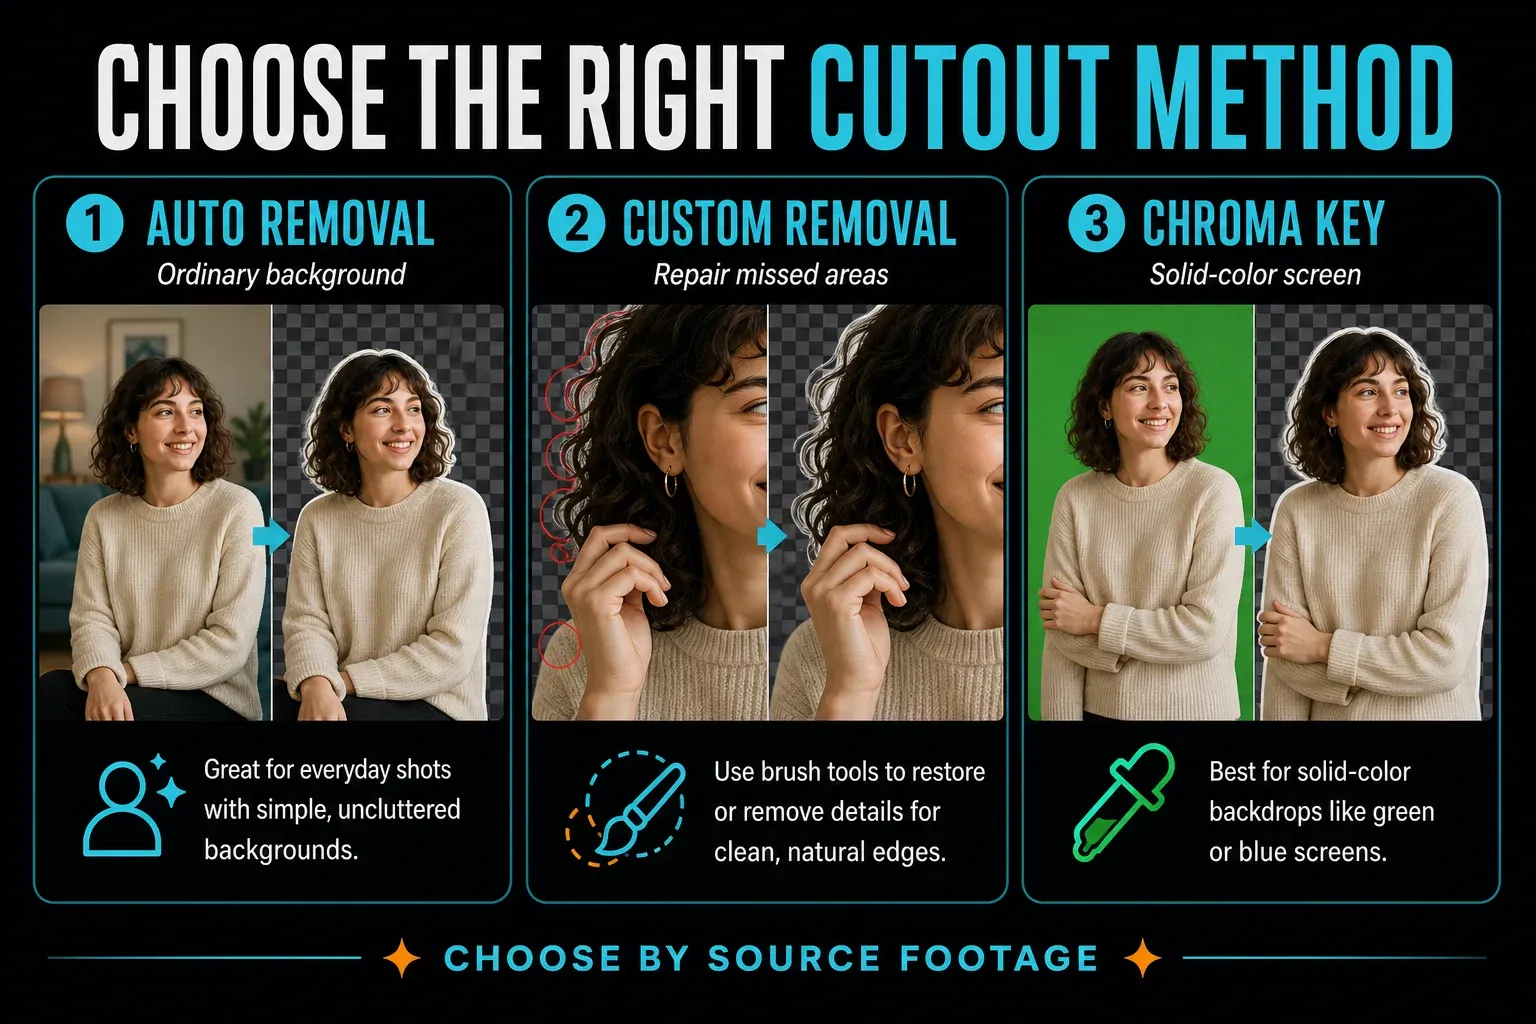
- Ordinary room, street or office: start with Auto removal.
- Rough or missing edges: run Auto removal, then repair only the failed areas with Custom removal.
- Clean green or blue screen: use Chroma Key.
- Overlapping subjects or difficult motion: split the failing section and repair it separately.
- Still photo: use the image background remover or the current Auto removal control.
Auto removal and Chroma Key solve different source problems. Footage recorded on a solid backdrop belongs in the dedicated CapCut green-screen workflow. For an ordinary scene, I wouldn't hunt for one color that stands for the whole background; I'd start with subject separation. Our broader overview of CapCut AI tools files this route under shot cleanup rather than clip generation.
What “Remove Background” Does Inside CapCut
CapCut builds a moving mask around the foreground. Pixels outside the mask turn transparent inside the composition, so another video, photo, gradient, blur, or color layer can show behind the subject. The source file isn't rewritten, and you can still recover the removed background while the original media and editable project are available.
That gives you three separate outcomes:
- Cut out the subject: Auto removal or Custom removal creates the foreground mask.
- Replace the background: place a new photo, video, color, or blurred duplicate beneath the cutout.
- Export alpha transparency: choose an export format and codec that preserve an alpha channel, if the current platform offers one.
The first two can work even when the final file is a standard MP4. The third can't be inferred from the editor preview. Keeping them apart avoids the common case where a perfect-looking checkerboard turns into a black or white rectangle after export.
Remove a Background in CapCut Mobile
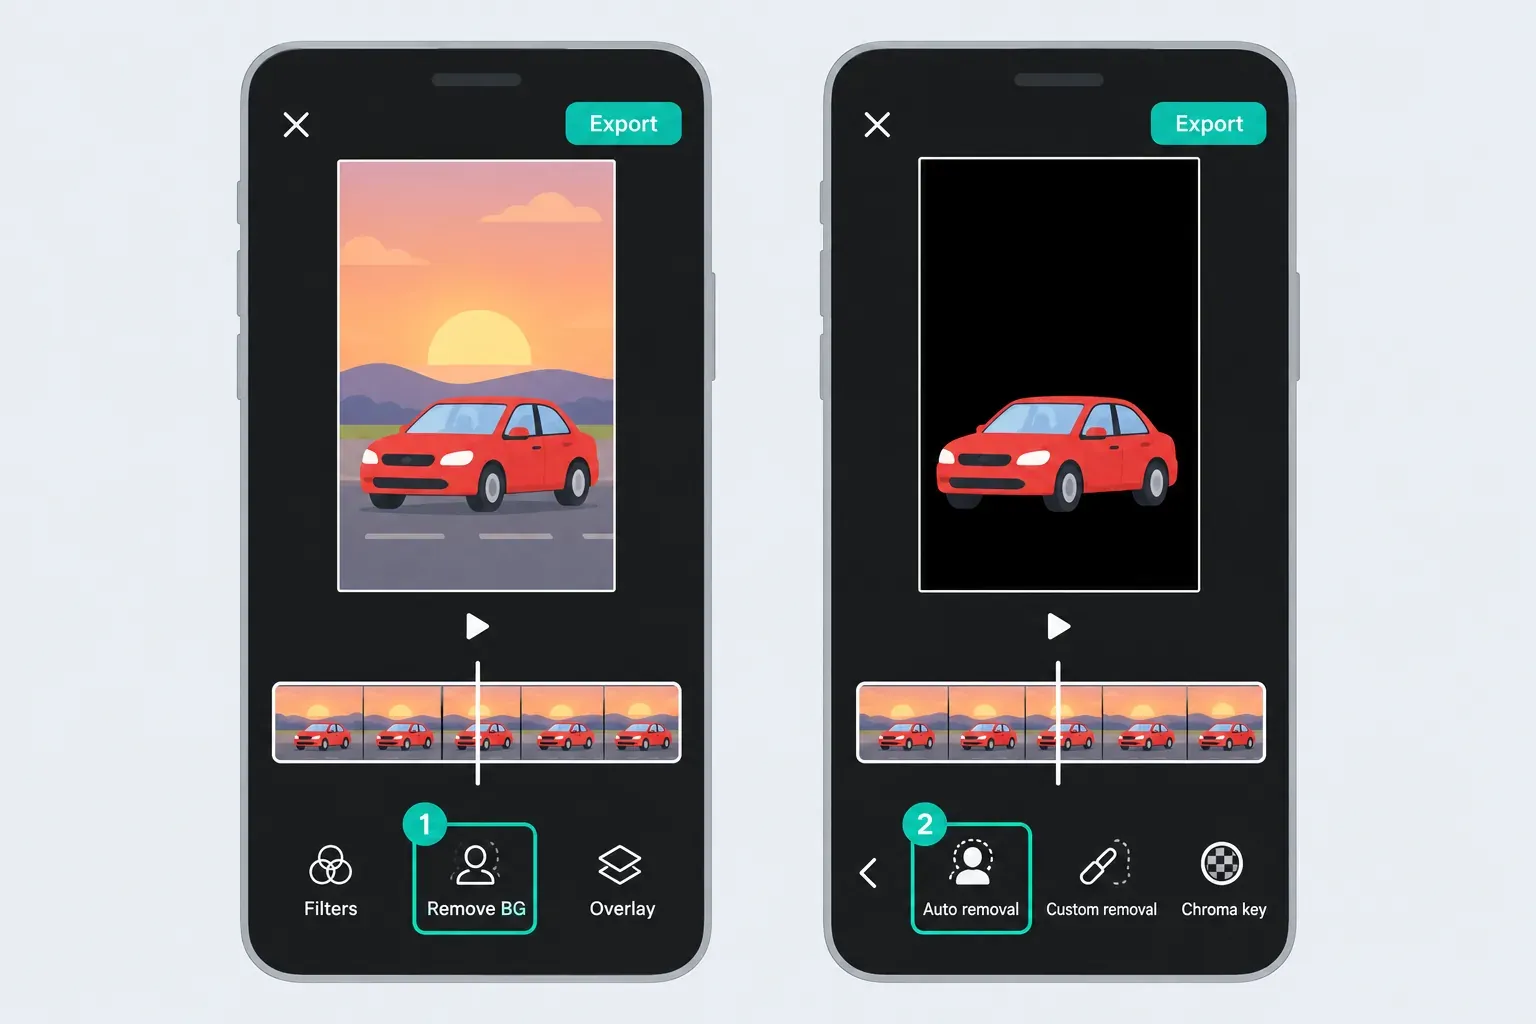
- Start with the cleanest source you have. Open CapCut, create a new project, and add the clip. Trim obvious unused sections before processing so CapCut has fewer frames to analyze.
- Select the video clip. The Remove BG command applies to the selected media, not to the empty canvas or an unrelated text layer.
- Open Edit → Remove BG. Choose Auto removal. CapCut analyzes the subject and removes the surrounding scene.
- Preview the full section. Watch hair, hands, feet, transparent objects, fast turns, and moments when the subject crosses a similar-colored area.
- Repair the mask where available. Use Custom removal to restore missing foreground with Smart brush or remove unwanted pieces with Smart eraser or Simple eraser. Names and availability can differ across builds.
- Add the new background. Insert a photo or video as an overlay and move it beneath the cutout, or use Canvas/background controls for a color or preset. Keep the subject layer above it.
- Check the composite at export size. A small preview can hide a thin halo that becomes obvious in a 1080p render.
CapCut's background-removal guide documents Auto removal, Custom removal, and Chroma Key on mobile. If the replacement layer covers the person, the issue is usually layer order; the CapCut overlay guide explains how foreground and background tracks stack.
Remove a Background in CapCut Desktop
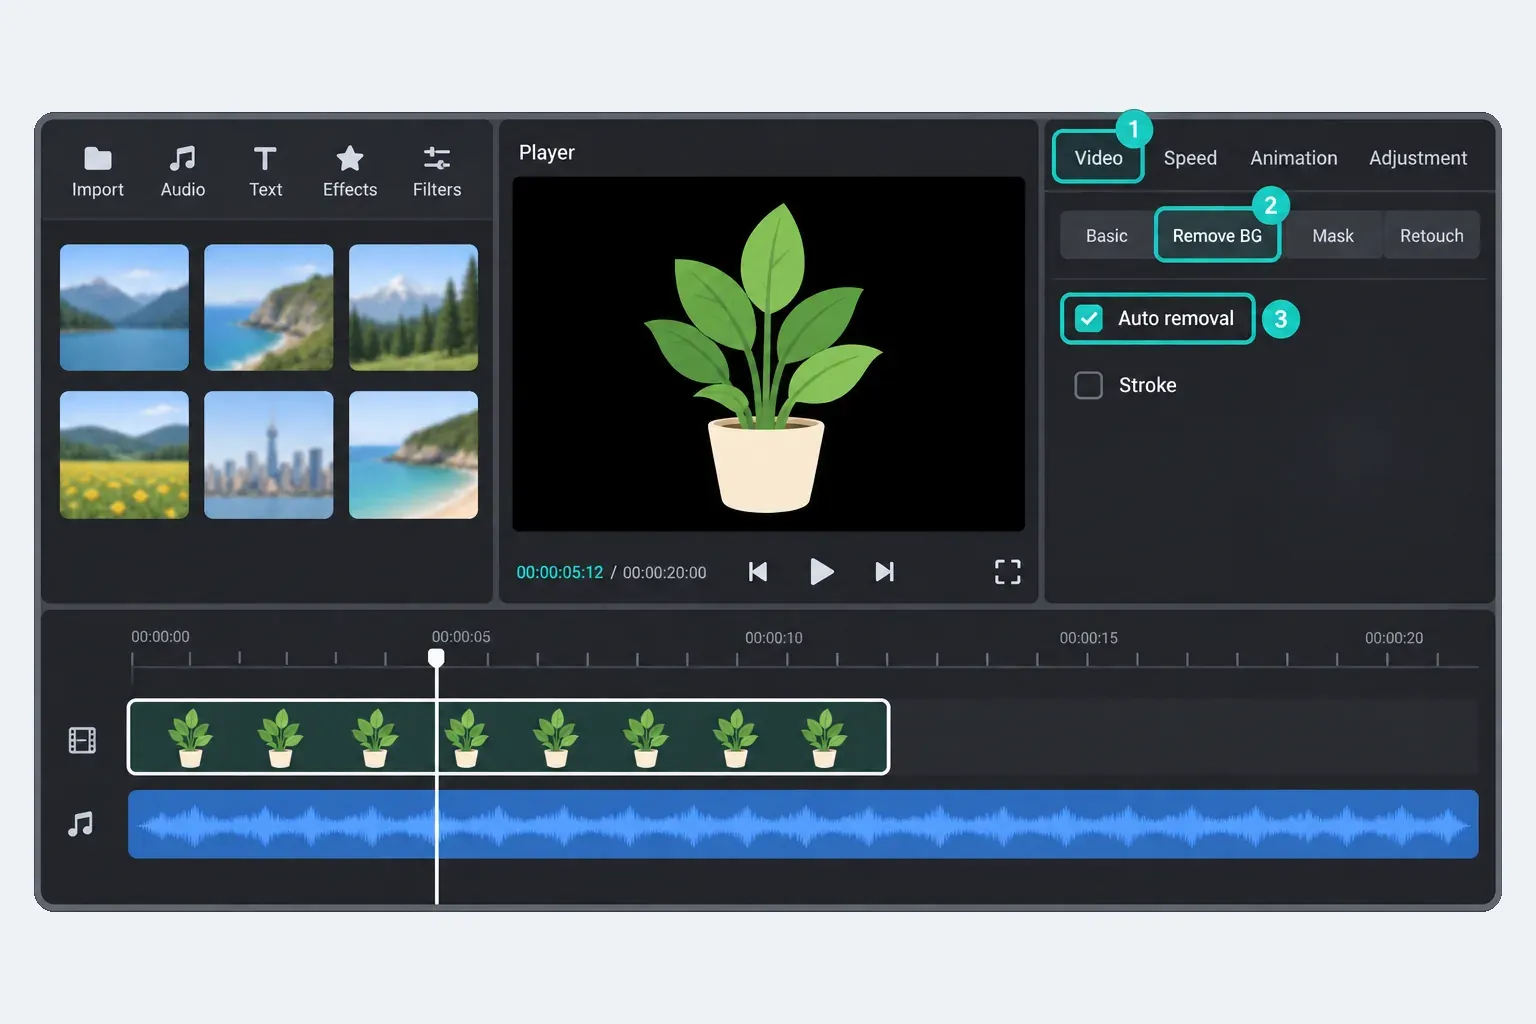
- Import the video, drag it to the timeline, and select the clip.
- Open the right-side Video controls and choose Remove BG.
- Turn on Auto removal and let the analysis finish before judging the edge.
- Scrub through motion rather than checking one paused frame. Look at the start and end of every cut as well as the fastest movement.
- Use Custom removal when present. Smart brush restores wanted subject areas; Smart eraser removes unwanted background; Simple eraser provides direct manual cleanup.
- Place the replacement media on a lower track. Reframe or scale the cutout only after the mask is stable, because a large zoom makes edge defects more visible.
CapCut's official video background remover gives the desktop path as Video → Remove BG → Auto removal. The same official material describes Smart brush, Smart eraser, and Simple eraser under Custom removal. If a tutorial shows a different panel, go by the labels in your installed build and check that the video clip itself is selected.
For a blurred-room look rather than a replacement scene, duplicate the clip, keep the blurred full-frame copy below, and remove the background from the sharp copy on top. The CapCut background-blur guide covers the complete layer order. Put a title between the two copies instead, and the same stack becomes the text-behind-person effect.
Remove a Background in CapCut Web
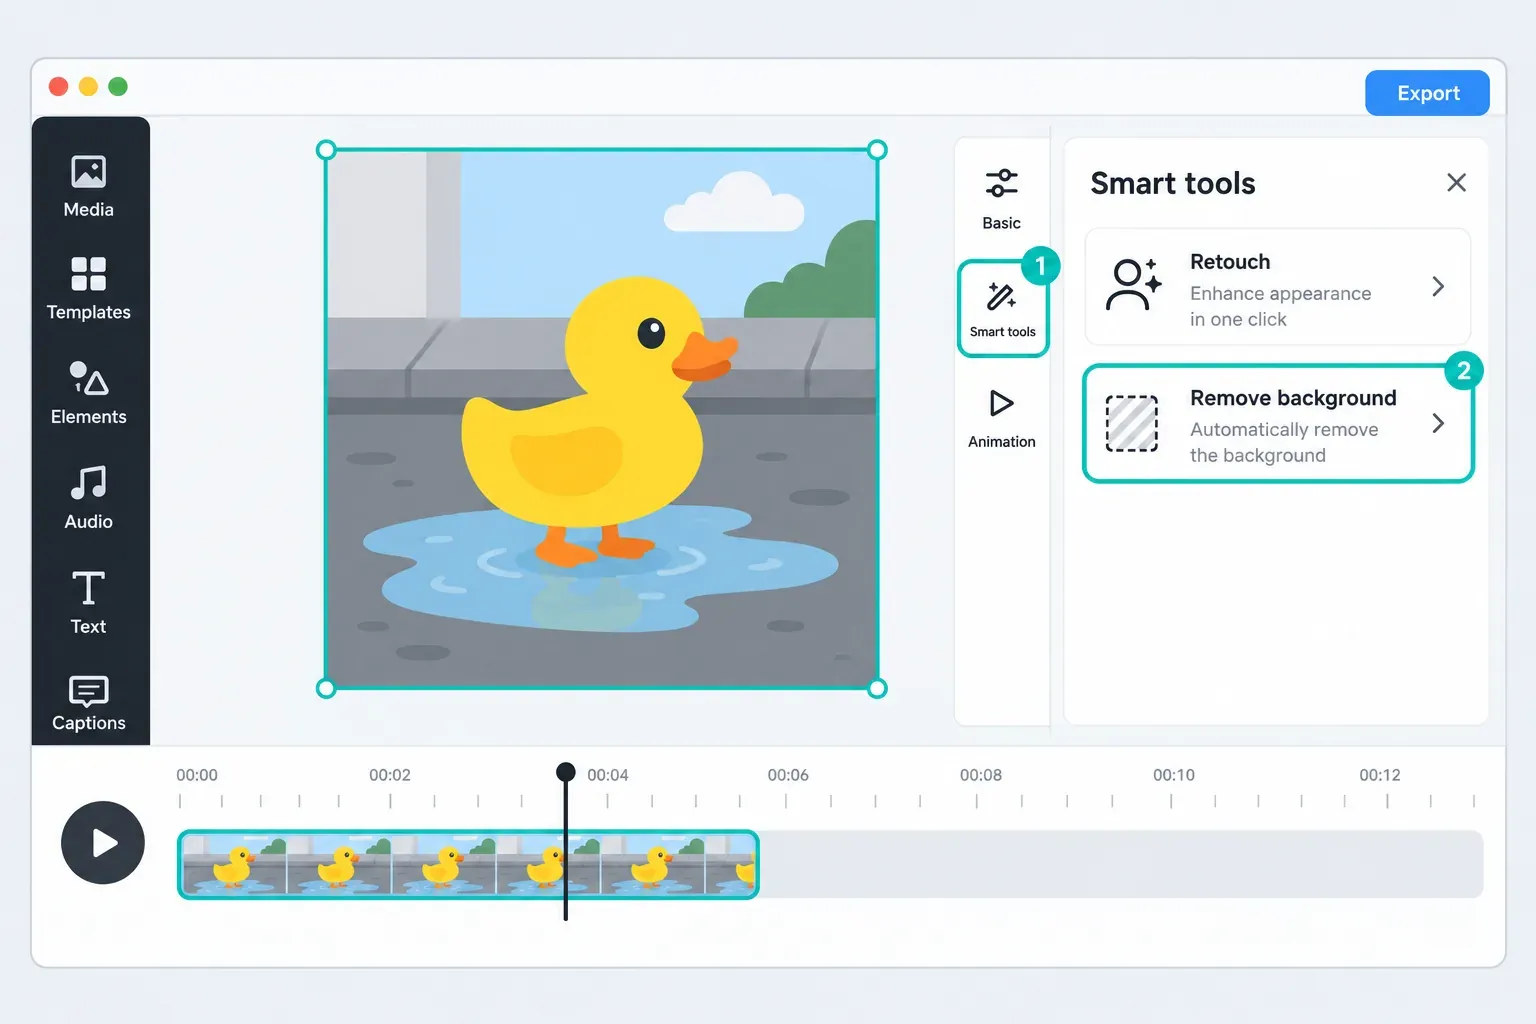
- Open the CapCut online editor and start a video project.
- Upload the source and add it to the timeline.
- Select the clip, open Smart tools, and choose Remove background.
- Run Auto removal, then inspect the result over the background you plan to use.
- Add a photo, video, or color beneath the subject and export a short test before committing to a long render.
On the web, processing can depend on upload speed, account access, browser resources, and a stable connection. Desktop may reduce browser constraints for long or high-resolution footage, but local project storage doesn't guarantee local-only processing of private media. If the browser reports an upload or connection failure, cut the test down to a short local clip, turn off aggressive content blockers for the editor, and retry before you change the original project.
Clean Hair, Hands, and Difficult Edges
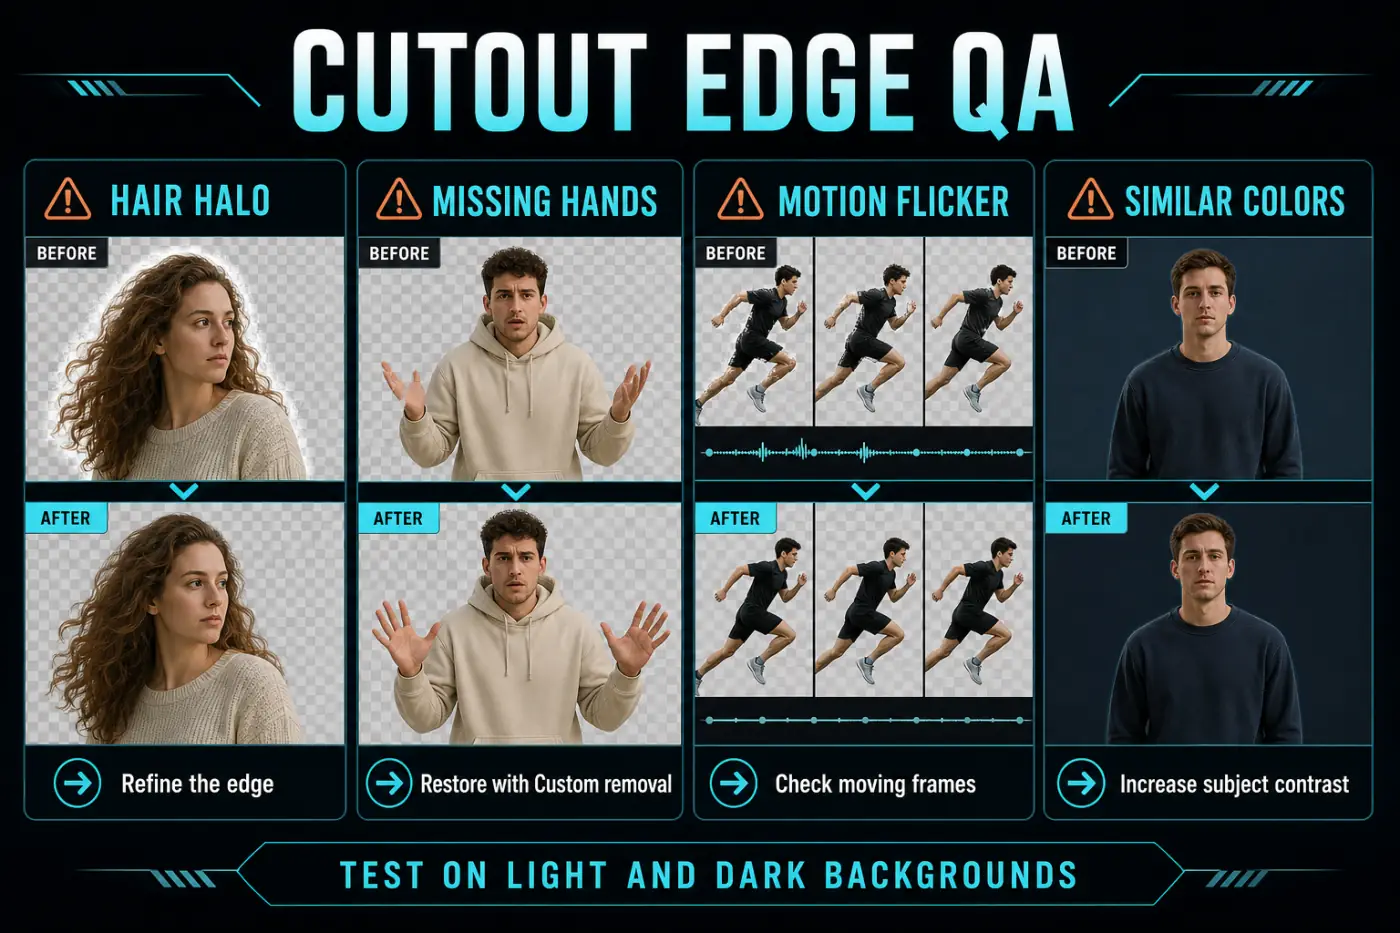
A cutout can look clean over a checkerboard and fail over the final scene. Place a bright solid color below the subject, inspect the edge, then switch to a dark color. Light halos become visible on dark backgrounds; dark contamination appears on light ones.
- Hair halo: avoid enlarging the subject to hide it. Refine or remove contaminated edge pixels, then judge the result at playback speed.
- Missing fingers or clothing: restore the subject with Custom removal. Zoom in, but check the repair across nearby frames so the restored patch doesn't reveal old background.
- Motion flicker: split the clip around the difficult movement and process shorter sections. One mask can make different decisions from frame to frame during blur or occlusion.
- Similar colors: increase separation before processing when possible with a modest exposure or contrast adjustment, or choose Custom removal. Don't crush detail merely to make the mask easier.
- Glass, veils, smoke, and motion blur: these contain partial transparency and are harder than an opaque subject. A convincing composite may require accepting some background contamination or using a more advanced editor.
Do edge cleanup after the main cut but before filters, sharpening, or heavy color grading. Strong sharpening can emphasize a halo, while a later crop or stabilization pass can move a defect into a more visible area.
Auto Removal vs Custom Removal vs Chroma Key
- Auto removal is the fast first pass for a normal mixed background, but it can lose fine detail or similar colors.
- Custom removal restores wanted subject areas or erases leftovers where the control is available.
- Chroma Key removes a selected solid color and works best with a deliberately lit screen.
CapCut's current green-screen instructions name Auto removal for footage without a green screen and Chroma Key for a selected solid color. Chroma Key isn't an “advanced” replacement for Auto removal in an ordinary room; it works because the source provides a consistent color to remove.
Fix CapCut Background Removal Problems
- Remove BG is missing: select the video itself, update CapCut and check the current Video or Edit panel.
- Analysis stalls: preserve the project, test a short local clip and restart the app or browser.
- The subject loses detail: repair with Custom removal and split difficult motion into shorter sections.
- A halo remains: check the cutout on opposite-color backgrounds and refine conservatively.
- The cutout flickers: isolate the fast action or subject crossing and repair that section.
- The replacement covers the subject: move it below the cutout layer.
- Export turns black or white: usable transparency is missing; check the export codec and import support, or add the final background in CapCut.
Missing or greyed-out controls can come down to the selected layer, build, platform, account or staged rollout. Treat that as a menu-availability problem first, not proof that the project is damaged. Leave the working edit intact, test a normal local clip, then decide whether an update or platform change is worth it.
Free vs Pro: Check the Current Account
Don't rely on an old table that marks background removal permanently free or permanently Pro. CapCut can change plan gates, AI credits, processing limits, templates, cloud access, and export prompts. A tool may be available on one platform and carry a Pro badge on another, or appear during a staged rollout.
My advice before a long project: process ten seconds and open Export. That one quick test shows whether the current account can use the removal method you picked and export the result without a surprise upgrade prompt. The broader CapCut Free vs Pro guide explains how to verify plan claims without treating a regional offer as universal.
Transparent Background Export: Avoid the MP4 Trap
CapCut's transparent-video and alpha-channel guide correctly separates subject masking from file delivery: a compatible format and codec have to carry the transparency. Standard MP4 using H.264 is normally a flattened delivery file and doesn't keep a reusable alpha channel.
If the current CapCut export panel offers a clearly labeled transparency or alpha-capable option, check its format and codec and run a short test. What's available can differ between desktop, web, and mobile. If the option isn't there, the dependable route is to add the final background inside CapCut, then export the finished composite.
- Export a five-second sample with the chosen transparency settings.
- Create a new project and place a bright color clip on the bottom track.
- Put the exported sample above it.
- If the bright color shows through cleanly, alpha survived. If a solid fill remains, the file or that import path has not preserved usable transparency.
A checkerboard in one preview app isn't enough evidence; some players display transparency differently. Re-import the file over a colored layer to test it in an editing context. For a normal finished composite, follow the CapCut export-settings guide and match resolution and frame rate to the source. If a render stalls, use the scoped checks in the CapCut export-stuck guide.
Final Quality Check Before Export
- Watch the full cutout at normal speed, then scrub the fastest or most detailed moments.
- Check hair, fingers, feet, gaps between limbs, transparent objects, entrances, exits, and subject crossings.
- Test the mask on both a light and a dark temporary background.
- Confirm that the replacement layer begins and ends with the foreground clip.
- Export a short sample at the intended resolution before processing a long project.
- Re-open the local file outside the editing timeline and inspect the first and last frames.
- If transparency is required, re-import the export above a color layer and verify the alpha channel.
The most reliable result isn't the one that looks clean in a single paused frame. What you want is the cutout that stays stable through the whole exported clip and arrives in a file format the next step of the workflow can use.
Keep the original source and editable project until the finished composite has passed this review, so a failed edge can still be re-edited from the original media.
CapCut Background Removal FAQ
Can CapCut remove a video background without a green screen?
Yes. CapCut currently documents Auto removal for clips without a green screen on mobile, desktop, and web. Results depend on subject separation, lighting, motion, and the current app build. Custom removal can repair missed or wrongly removed areas where that control is available.
Where is Remove BG in CapCut?
On desktop, select the clip and open Video, Remove BG. On mobile, select the clip, open Edit, and choose Remove BG. In the web editor, select the clip and open Smart tools, Remove background. Labels and placement can vary by version, account, platform, and region.
Is CapCut background removal free?
Some accounts can use basic background removal without a paid plan, but CapCut changes feature access, credits, Pro badges, and export limits by platform, account, and region. Check the current control and the export screen before building a project around a free-access assumption.
Why does CapCut remove part of the person?
The foreground may be too similar to the background, motion may be blurred, or fine details such as hair and fingers may be hard to separate. Use Custom removal to restore the subject, split difficult sections, and test the cutout over both light and dark backgrounds.
Should I use Auto removal or Chroma Key?
Use Auto removal when the source has a normal room, street, or mixed background. Use Chroma Key when the footage was shot against a consistent solid color such as green or blue. Chroma Key gives more direct control over a known color; it is not the correct first tool for a varied background.
Can CapCut export a video with a transparent background?
A clean cutout inside a CapCut project doesn't by itself guarantee a transparent video file. The export format and codec must support alpha transparency, and availability varies. Standard MP4 with H.264 is normally flattened. If no verified alpha-capable export is offered, add the final background inside CapCut before exporting.
How do I check whether transparency survived export?
Re-import the exported file into a new project and place a bright solid color beneath it. If a solid fill remains in the expected transparent area, check both the exported codec and the importer's alpha support before concluding that the file was flattened. Don't rely on a checkerboard preview alone.
Why is CapCut background removal stuck or missing?
Confirm that the video clip itself is selected, update the app, restart the project, and test a short local clip. Web and cloud-assisted processing also need a stable connection. If the tool remains unavailable, it may be a platform, account, regional, or staged-rollout difference rather than a damaged project.