


A good CapCut velocity edit has a reason for every speed change. Slow the clip where the viewer needs to see the action, speed through the less important movement, then come back to a readable pace. The curve should serve the footage and the music instead of announcing that an effect was applied. For the editing steps around the speed ramp, our step-by-step CapCut tutorial ties together the core cut, audio, motion and export lessons.
Quick answer: for a controlled speed ramp, select the clip and open Speed > Curve. Choose Custom on Mobile or Web, or Customized in CapCut's current Desktop route. Add a few points around one action peak, move the playhead across the ramp, and check a short export outside the editor. Reach for Auto Velocity only when you want CapCut to propose the timing.
Choose the Right Velocity Tool First
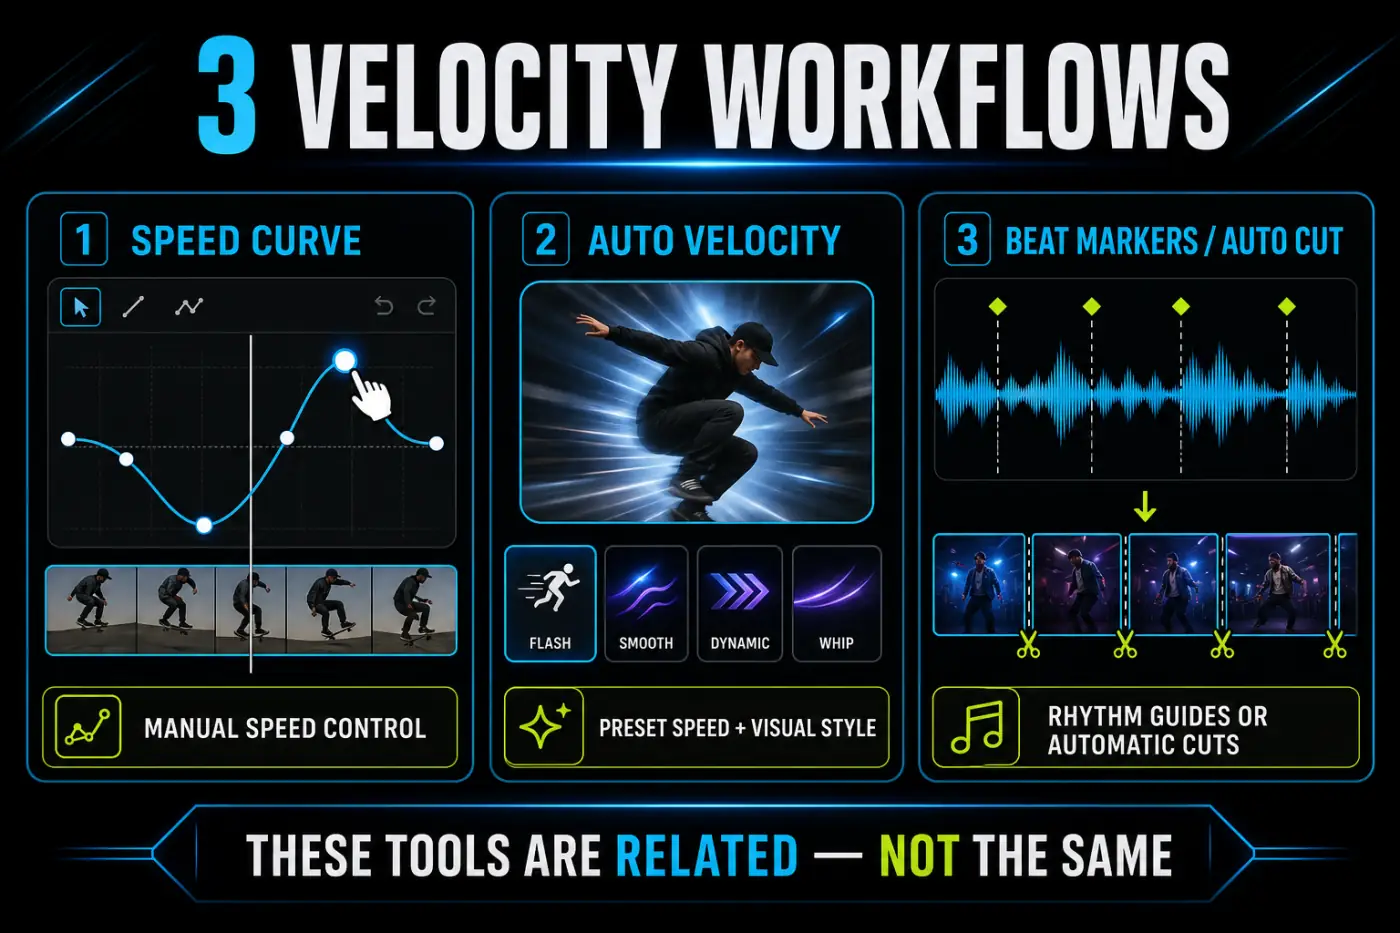
CapCut places several related features close together, but they don't do the same job:
- Speed Curve changes playback speed over time and gives you manual control over every ramp point.
- Auto Velocity generates a styled speed treatment where the feature is available. It is a starting edit, not a guaranteed finished result.
- Beat markers place timing references on the audio. They don't change clip speed by themselves.
- Auto Cut assembles cuts around music, speech or a chosen rhythm. CapCut's current Auto Cut Help page documents it for Mobile and Desktop, not Web, and warns that rollout can vary by region or account.
For one subject slowing at the apex of a jump, start with Speed Curve. Auto Cut may be closer to the task when you want a fast draft from several clips and a song. And if the edit already exists and you only need the changes to land on music, add beat markers and build the curve yourself. Pick the right tool up front and you won't end up fighting an automatic result built for a different job.
Plan One Clean Speed Ramp
Before you open the curve, pick the exact frame that deserves attention. That could be the moment a skateboard leaves the ground, a product lands on the table, a dancer hits a pose or a camera move changes direction. Put the deepest slow point there, not just on the nearest drum hit.
A basic ramp needs three regions:
- Approach: normal or faster motion moves the viewer toward the action.
- Focus: a slower section makes the important movement readable.
- Exit: speed rises smoothly enough that the return doesn't feel like a dropped frame.
Start with fewer points than the preset shows. Four or five deliberate points are easier to adjust than a row of tiny changes. A sharp peak gives you an abrupt rate change, while a wider hill or valley lets the footage speed up or slow down over more time. Shape usually matters more than chasing an exact speed number copied from another clip.
Don't trim the clip until you've found enough material on both sides of the action. Put a dramatic slow point right against the first or last frame and there's no room left for a readable transition. Leave handles, build the ramp, then tighten the edit.
When the source matters, work on a duplicate clip or project. If you keep both versions on one timeline, disable or mute the unused video and audio and confirm their durations; speed changes can move captions, later cuts and overlays. A separate project copy is safer when the source is important. You get an honest before-and-after comparison, plus a quick way back if an automatic style changes more of the clip than you expected.
How to Make a Velocity Edit in CapCut Mobile
- Add the clip and move the playhead near the action you want to emphasize.
- Tap the clip on the timeline so the editing controls belong to that video.
- Open Edit > Speed > Curve > Custom in CapCut's current official Mobile route.
- Add or move curve points around the action. Raise a point for faster playback and lower it for slower playback.
- Preview from before the ramp through after it. Adjust the spacing as well as the height of the points.
- Confirm the curve, then export a short test before applying the same pattern to other clips.
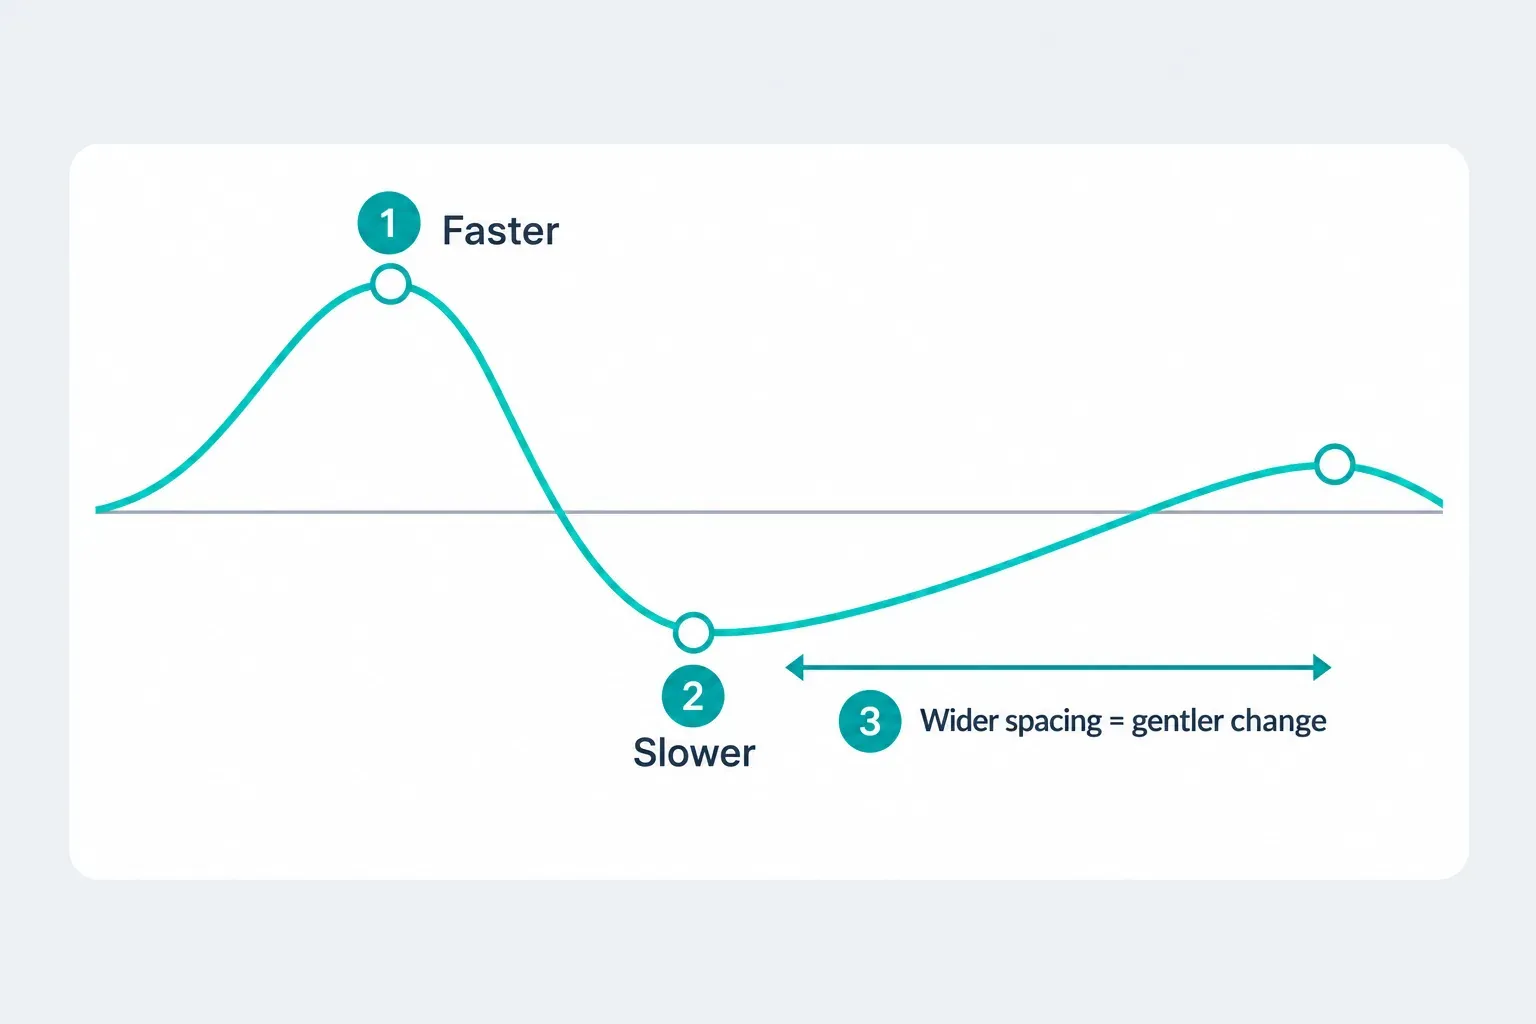
A point's vertical position sets relative speed, and the distance between points sets how long the change takes. Dragging a slow point lower won't automatically smooth the transition into it. If the motion snaps, widen the approach by moving the neighboring point farther away.
On a busy project, Mobile previews can drop frames. Close background apps you don't need, preview a short section, then check an exported file. Don't keep adding curve points to make up for playback lag that may not show up in the final render.
If Curve is missing, first make sure a normal video clip is selected. Still images, templates, compound items or special assets may show different controls. Scroll the toolbar, update CapCut, and try a plain clip in a blank project before you change an edit that already works.
How to Make a Velocity Edit in CapCut Desktop
Desktop gives you more room to read the curve and line it up with the timeline. Select the video clip, open the Speed controls on the right side, choose Curve, then pick Customized, following the current official Desktop route. If Speed isn't visible in that panel, select an actual video clip and check the toolbar above the timeline; panel placement and labels can differ by build. A community report showing the alternate toolbar placement is a useful fallback, not a universal rule.
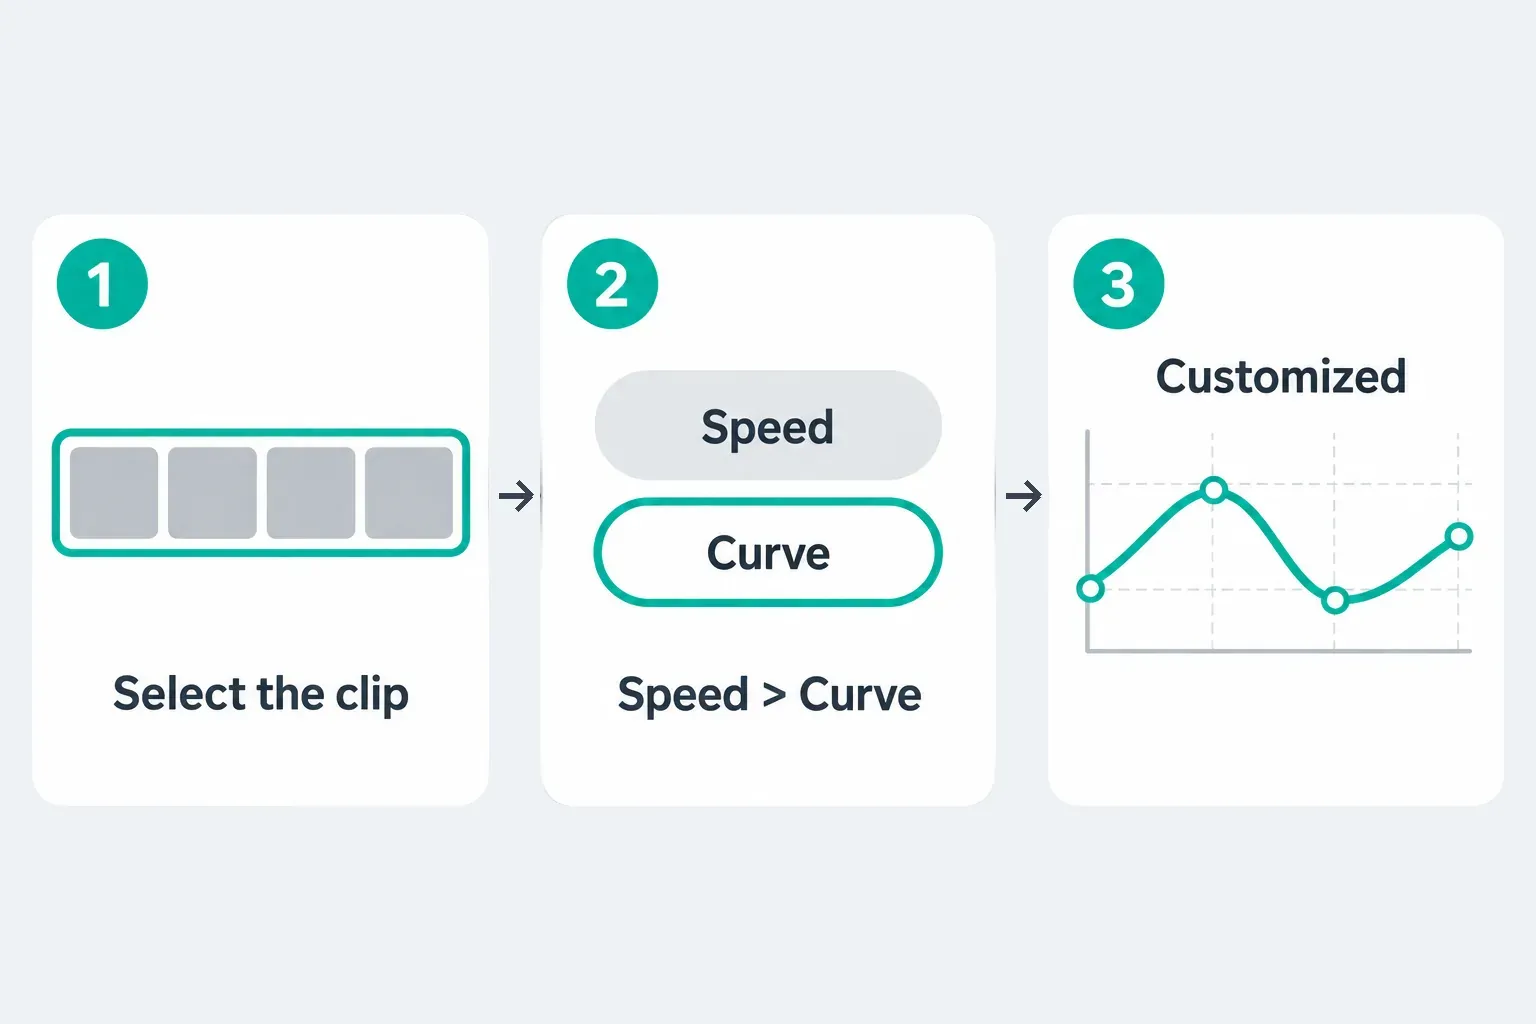
- Place the playhead on the action peak and note its timeline position.
- Open the customized curve and locate the point controlling that moment.
- Pull that point down to slow the action or up to accelerate it.
- Spread the neighbouring points to soften the entry and exit.
- Play through the cut with audio, then mute the audio once and judge the motion on its own.
- Export the difficult section and inspect it at normal playback speed.
Play it muted once, because a strong beat can make a rough visual change feel intentional. If the ramp only works with the music on, fix the motion before you add more effects. Once the movement looks clean on its own, the music reinforces it instead of covering for it.
Keep playback-rate work separate from transform animation. Speed Curve changes the timing of the footage. Position, Scale, Rotation and Opacity keyframes change how an element moves or looks. Use our CapCut keyframes tutorial when the clip should zoom, pan or fade without changing its playback rate.
How to Make a Velocity Edit in CapCut Web
On Web, CapCut's current official workflow is to select a timeline clip and open Speed > Curve > Custom. Before uploading private or client footage, confirm that you have permission and that your project policy allows browser upload. The curve works the same way here: higher points play faster, lower points play slower, and horizontal spacing sets how long the transition lasts.
- Upload the source clip and place it on the timeline.
- Select the clip, then open Speed and Curve in the right-side controls.
- Choose Custom, place the slow point on the action and shape the surrounding ramp.
- Preview a short range. Browser lag, network activity and device memory can affect the editor preview.
- Export a representative section before treating a stutter as a curve problem.
Don't expect every Mobile preset or automatic feature to show up in the browser. CapCut's Auto Cut documentation says Web isn't supported. Manual Curve is the dependable Web route, and it's the one the current official velocity resource describes. If a project relies on a Mobile-only automatic style, finish that part on the platform that offers it instead of hunting for a hidden Web menu.
Use Auto Velocity Without Losing Control
On Mobile, CapCut's current official route puts Auto Velocity under Edit > Style > Velocity. Add or choose a sound so CapCut can detect the music, select a style, wait for processing, then confirm with the checkmark. Some styles are free and some may be paid, so check the label shown on your account. Preview the whole result before keeping it; if the music prompt or style is unavailable, use a manual Speed Curve instead. Availability and exact styles can vary by build, account or region.
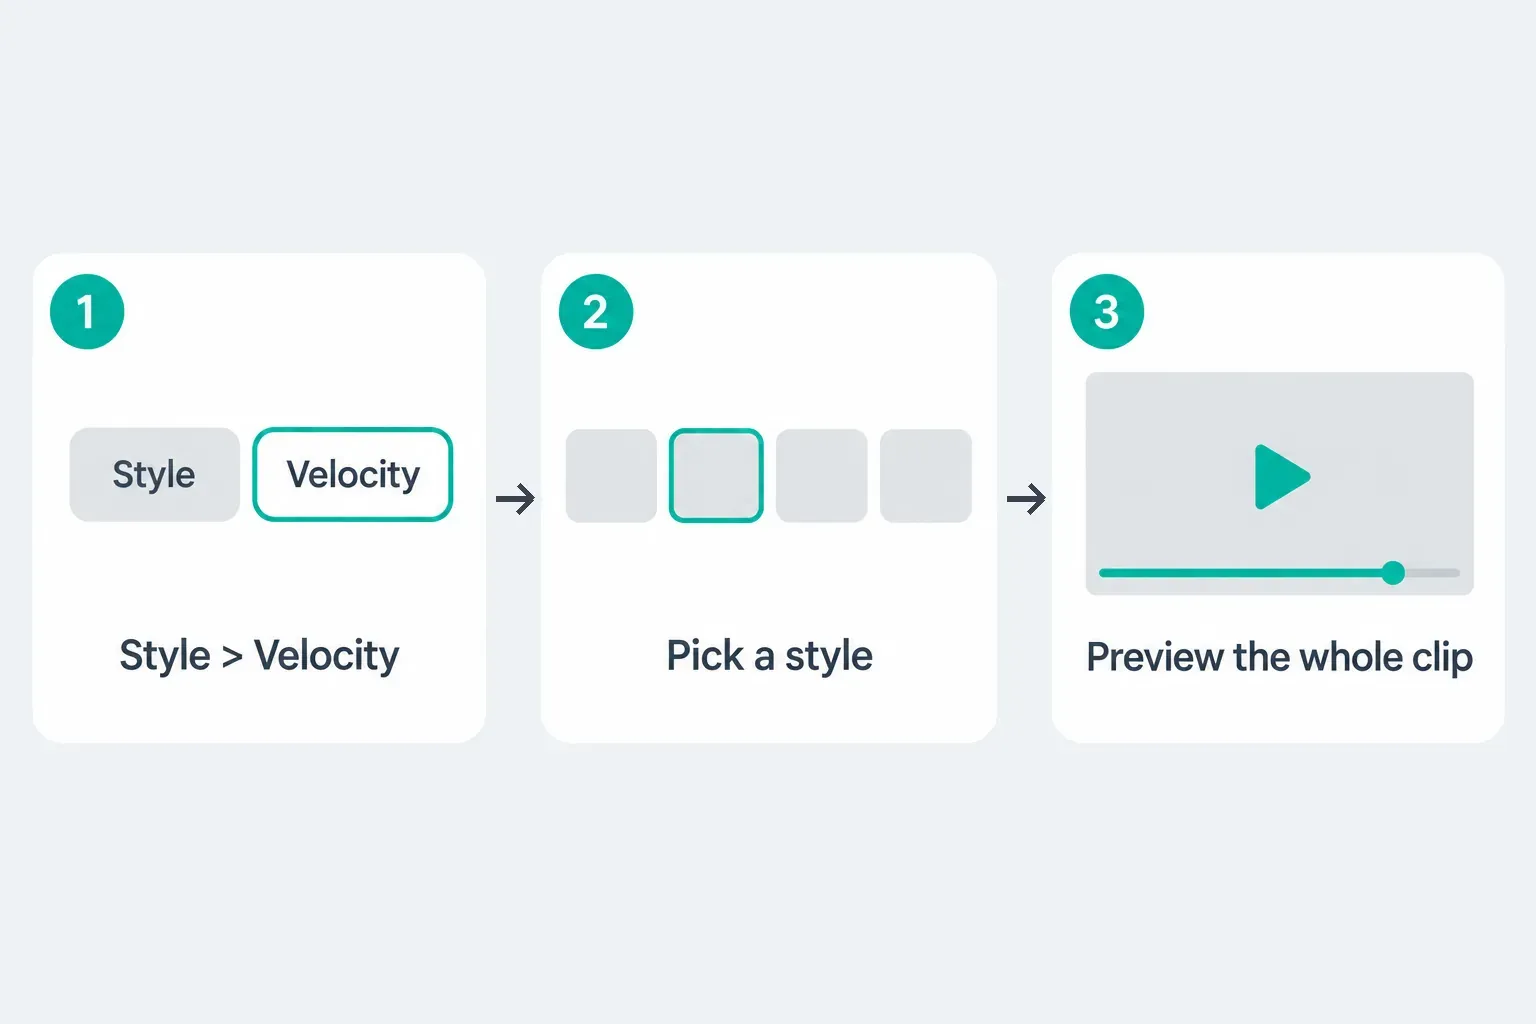
Automatic timing is at its best when you want a fast draft or several alternative rhythms. It's weakest when one precise physical action has to stay readable. Before you keep the result, check these points:
- Does the slowest moment land on the actual action rather than the nearest beat?
- Did the effect shorten or stretch a section you need for dialogue or a transition?
- Are faces, hands, wheels, water or hair breaking during the slowest frames?
- Does the speed change repeat so often that the clip feels mechanically pulsed?
When only one section is off, manual Speed Curve is often quicker than regenerating the whole style again and again. Keep the automatic version on a duplicate clip or timeline, then rebuild the useful rhythm with fewer manual points.
Auto Velocity also isn't Auto Cut. Auto Velocity styles the playback speed of the footage you select. Auto Cut builds an edited sequence from clips using music, speech or rhythmic analysis. Both may sit near other AI tools in the interface, but they don't make the same decision.
Sync the Velocity Edit to Music
Add the music first and find the section you'll use. CapCut's current music workflow covers both manual beat flags and automatic beat detection. In its documented online route, select the audio timeline, place the playhead and click Add beat (the flag icon), or use Beats detection (the flag with an A). The markers show you timing; they don't decide the shape of the curve.
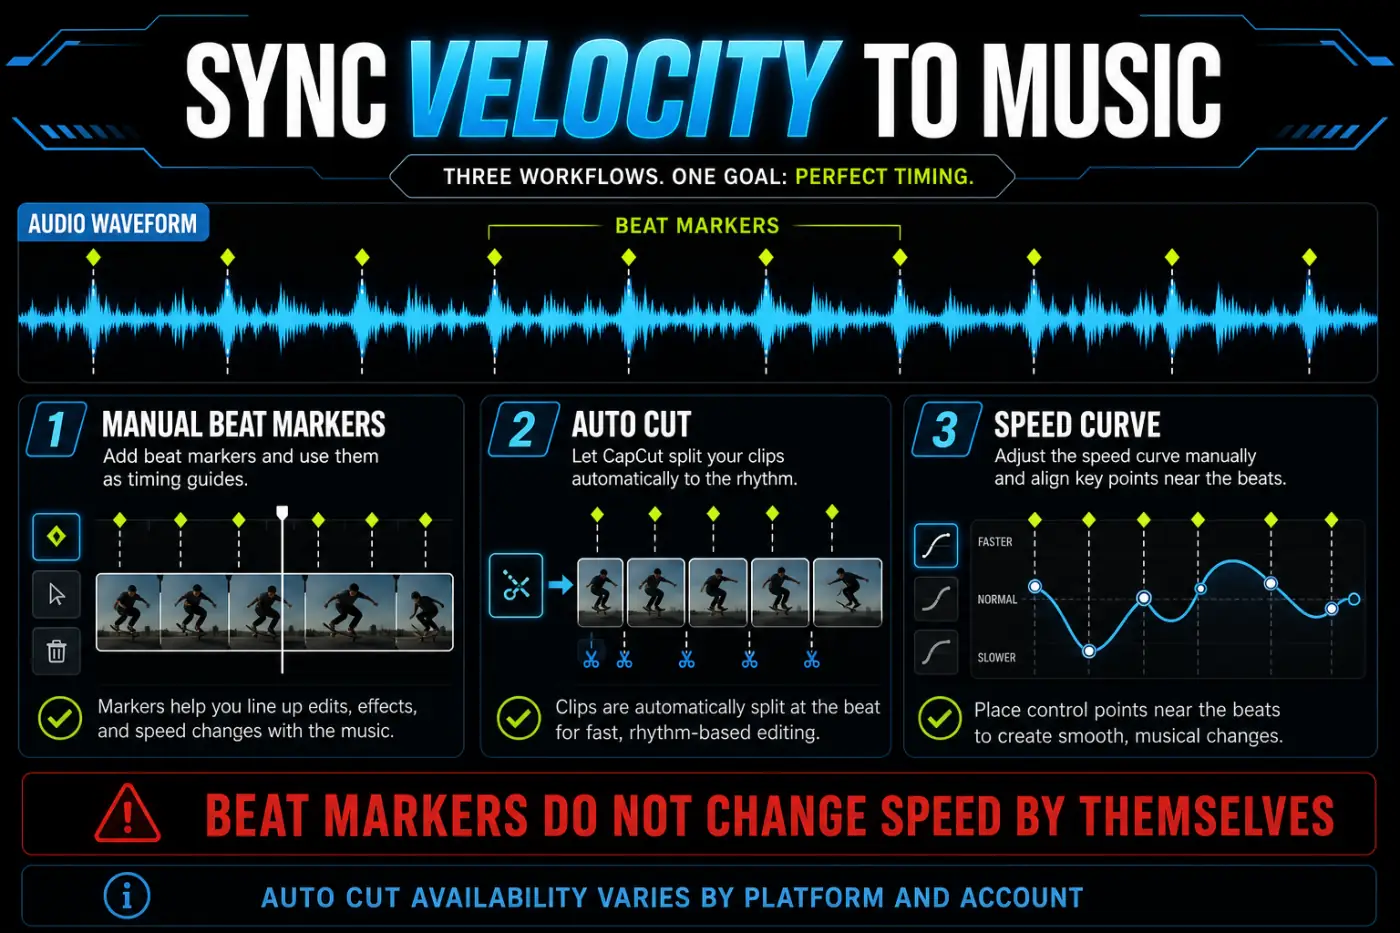
- Mark the strongest beats or let CapCut generate beat references where that option appears.
- Find the visual action peak independently.
- Choose the nearest useful beat for the entry, focus or exit, rather than forcing all three onto markers.
- Build the curve and listen through the section without watching.
- Watch once with the audio muted to confirm the motion still reads cleanly.
A beat can mark where the acceleration starts while the slow point lands a few frames later, on the movement itself. That offset often feels more natural than snapping every curve point to the waveform. Changing a curve point or trimming after markers can retime the clip, so recheck the action frame, downstream cuts, captions and audio or crossfades after the curve settles. The music gives you rhythm; the footage gives you meaning.
If the track still needs importing, extracting, trimming or fading, the CapCut music guide covers it. Keep audio setup apart from curve troubleshooting so you don't mistake a misplaced song start for a velocity problem.
Use Presets as Starting Shapes
The current official velocity guide shows styles such as flash, fade blur, blur shake and retro zoom. A separate CapCut speed-controller article uses curve examples such as montage, hero shots, bullet time, jump cuts, flash-ins and flash-outs. Treat these as examples, not a permanent list; names and availability can differ by platform, account, region and release.
Choose by curve behaviour, not by name:
- Use a single broad valley when one action needs a clear slow focus.
- Use a fast entry and gentle exit when the clip should arrive sharply and settle.
- Use repeated peaks only when the footage and music contain repeated actions that justify them.
- Avoid a multi-pulse preset on dialogue, continuous camera movement or a product demonstration unless the interruptions are intentional.
Once you've applied a preset, move its points to your action. A preset that happens to look good on CapCut's sample has no idea where your subject jumps, turns or makes contact. What you're borrowing is the starting shape, not the label.
Fix Choppy Ramps and Slow-Motion Artifacts
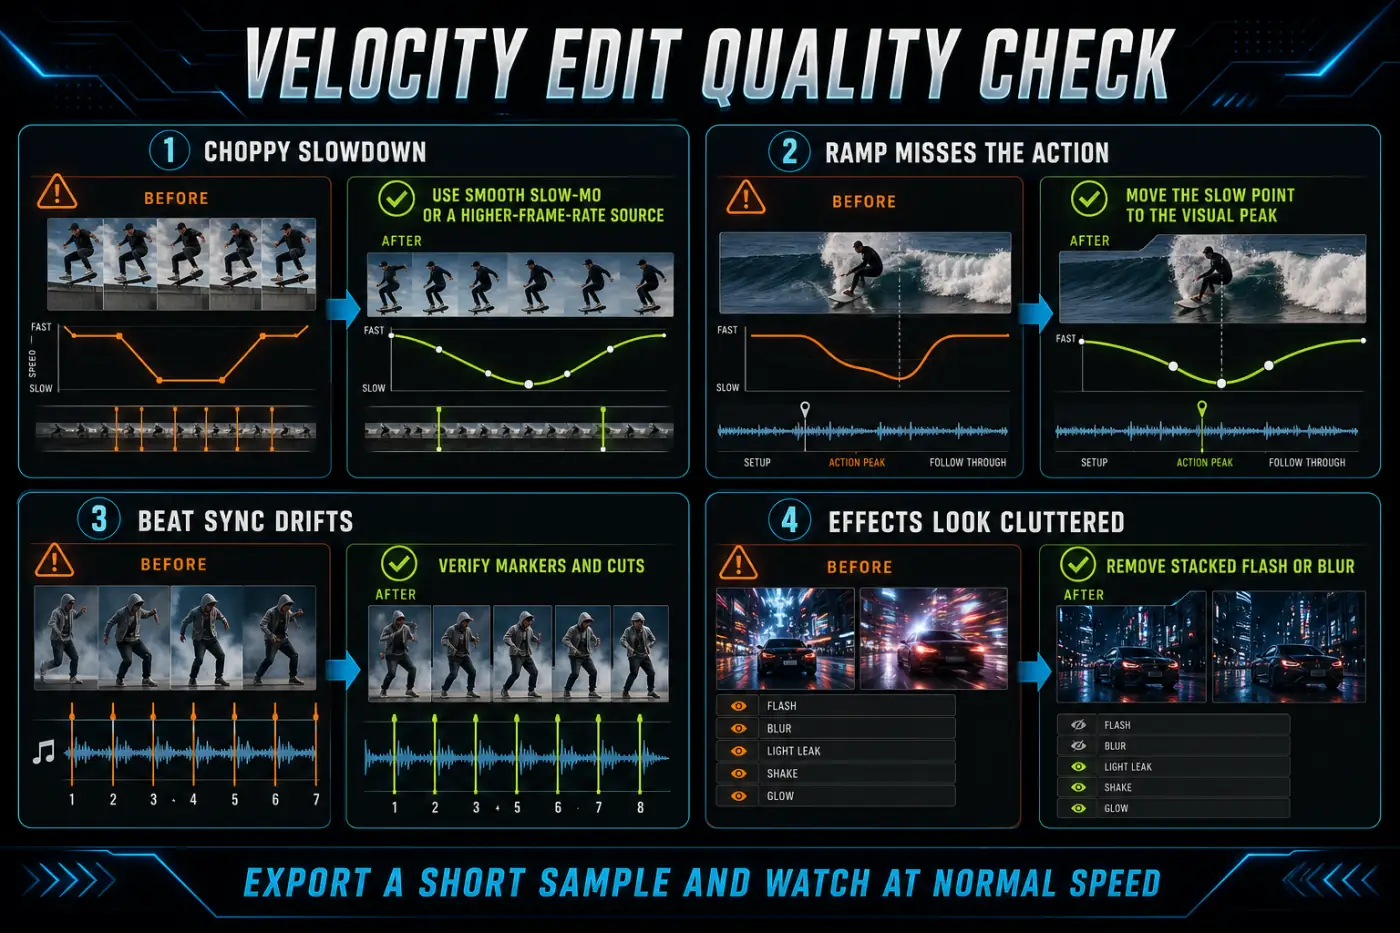
The speed change snaps
Spread the points out around the change. A narrow valley asks the clip to slow down and speed back up in too little time. Delete extra points that create tiny opposing changes, then rebuild one clear approach, focus and exit.
The slow section repeats or judders
The source may not have enough distinct frames for the slowdown you're asking for. Make the slow section shallower or shorter. For planning, a 60 fps source slowed to 0.5× supplies about 30 source frames per second of playback, while 30 fps supplies about 15; interpolation may help, but it can warp motion boundaries and cannot recover hidden detail. Where available, try Smooth slow-mo or optical flow. CapCut's current optical-flow page explains that the process generates intermediate frames. If the speed came from a reusable template instead of a custom curve, switch to the separate CapCut slow-motion template guide, since the template may already contain timing you need to inspect.
Hair, hands, wheels or water warp
These push against the limits of interpolation. Where those choices are available, compare the result with frame blending or with no interpolation. Shorten the affected slow section, pick a cleaner part of the motion, or settle for a less extreme slowdown. Check it at full size, because a small editor preview can hide duplicate edges and bent outlines.
The preview stutters but the curve looks sensible
Render or export a few seconds around the problem and watch that file outside CapCut. On Desktop or Web, use the range controls if your build exposes them; on Mobile, duplicate the project or clip before a short test. Restore the full range and any intended audio before the final export. Heavy effects, high-resolution media and browser or device load can all make the preview unreliable. I wouldn't rebuild a correct curve to match a struggling preview, because that can make the final export worse.
The automatic style feels random
Duplicate the clip, remove the automatic style from one copy and recreate only the useful changes with Custom Curve. Automatic analysis can't know which gesture, facial expression or product detail matters to your story.
Finish the Edit Without Overloading It
Lock the ramp before you add flashes, shakes, zooms and transitions. Extra effects can hide a bad speed change while you edit and amplify interpolation artifacts on export. The CapCut effects guide covers where effects are available and how to place them, and the CapCut transitions guide helps you decide whether a cut needs a transition at all.
Use this final order:
- Watch the source and choose the action peak.
- Build one speed ramp with as few points as possible.
- Check the motion with and without music.
- Inspect the slowest frames for duplicate edges, warping and missing detail.
- Add only the effects and transitions that clarify the rhythm.
- Export the difficult section and watch it on another player or device.
- Export the complete project only after the short test passes.
A clean ramp can hold up without a flash on every beat. Give the viewer time to take in the motion. Repetition works when the footage has a real repeated pattern. Otherwise it quickly looks like a preset dropped over unrelated clips.
If the curve is right but the rendered file looks soft or jerky, or comes out much larger than expected, switch to our CapCut export settings walkthrough. Resolution, frame rate, bitrate, format and codec are export decisions. After the short test passes, restore the full range and intended audio before exporting the complete project.
CapCut Velocity Edit FAQ
What is a velocity edit in CapCut?
A velocity edit changes a clip's playback speed over time. A typical ramp slows near an important action, accelerates through movement and returns to normal speed. In CapCut, you can build it manually with Speed Curve or use Auto Velocity where that feature is available. If you only need to speed up the video at one steady rate, Normal speed is simpler than a curve.
Where is Speed Curve in CapCut Mobile?
Select the clip, open Edit, choose Speed, then Curve and Custom. CapCut may move or rename controls between builds, so select a normal video clip first and scroll the editing toolbar if Curve is not immediately visible.
Where is Speed Curve in CapCut Desktop and Web?
On Desktop, select the clip and open Speed, Curve, then Customized in CapCut's current official route. On Web, select the clip and use Speed, Curve, then Custom. Labels and panel placement can vary by build and selected element.
Is Auto Velocity the same as Speed Curve?
No. Speed Curve gives you manual control over timing and speed points. Auto Velocity applies a generated style; the documented Mobile workflow can detect music before applying it. Use the automatic result as a draft, then check every slow section, cut and beat before exporting.
Do beat markers change the clip speed automatically?
No. Beat markers are timing references. You still place curve points, cuts or transitions around them unless you use a separate automatic feature. A marker tells you where a beat lands; it doesn't decide which moment should be slow or fast.
Why does my CapCut velocity edit look choppy?
The ramp may be too abrupt, the slow section may lack enough source frames, or the editor preview may be struggling. Widen the transition into and out of the slow point, test Smooth slow-mo or optical flow where available, and export a short section before rebuilding the curve.
Can I make a velocity edit in CapCut Web?
Yes. CapCut's current official Web workflow includes Speed, Curve and Custom for manual ramps. Current Auto Cut Help says Auto Cut is not available on Web, and automatic tools or preset choices may differ from Mobile and Desktop.
Which CapCut velocity preset is best?
There's no universal best preset. Choose a shape that puts the slow point on the action you want viewers to notice, then adjust it. Preset names and availability can change, so judge the curve and exported motion rather than choosing by label alone.